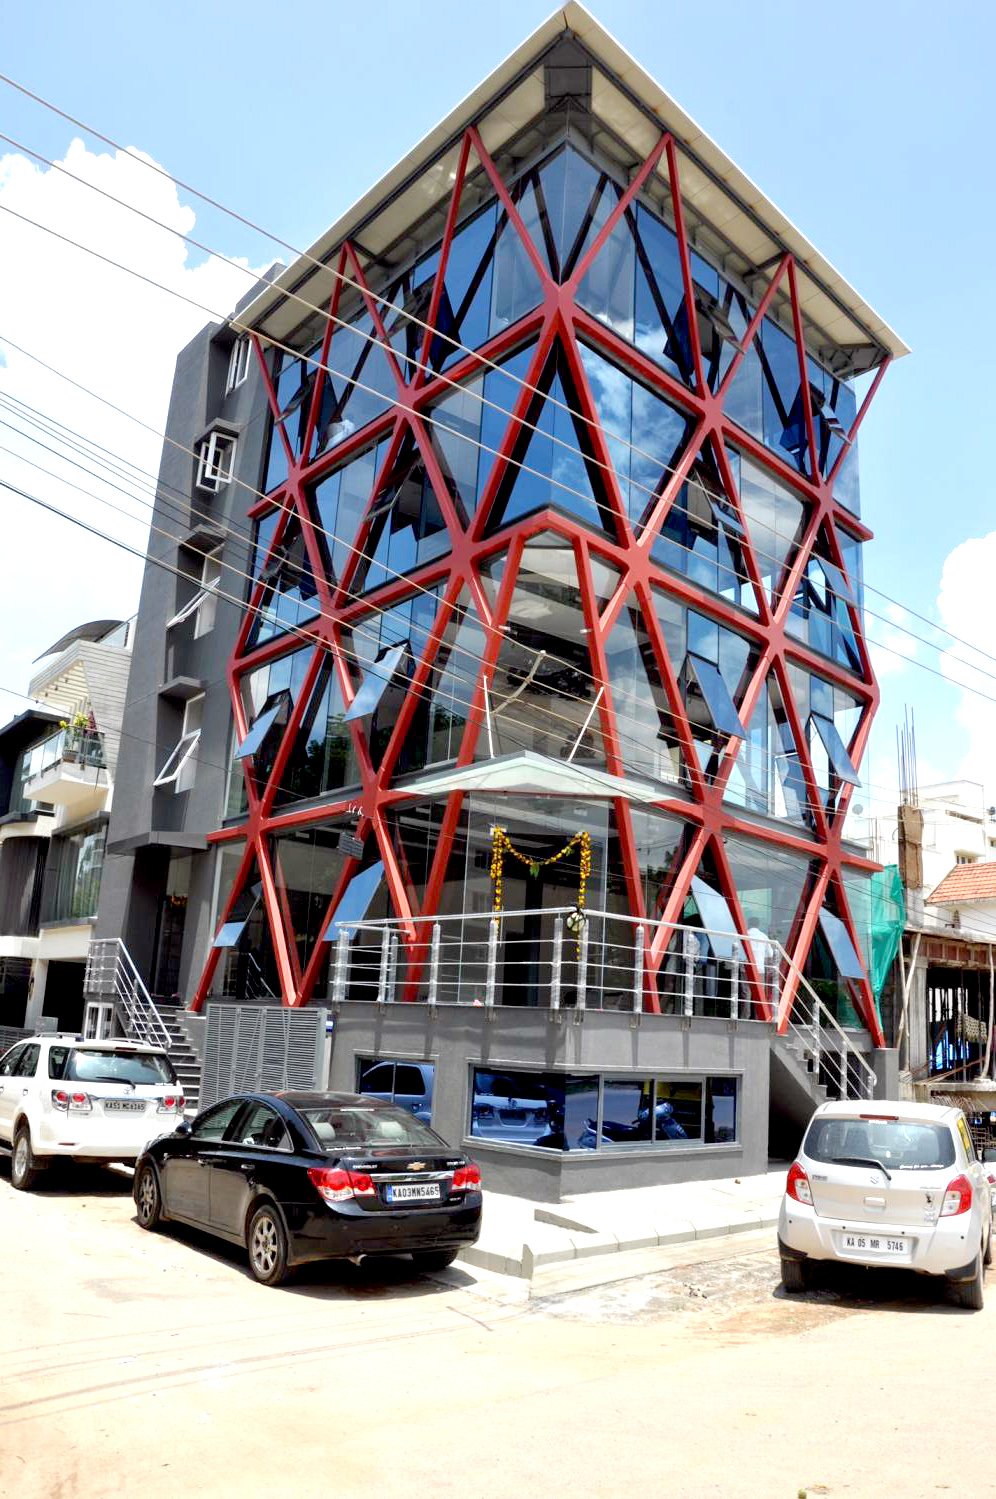
For a commercial complex locate at Kalyan Nagar in Bangalore, we decided to do away with the conventional column and beam structure in favor of a lattice structural system, which was used as the architectural feature. The idea stemmed from the want to ‘celebrate steel’ and to celebrate the structure instead of concealing it behind the facade.
Ideation
In a typical beam column steel system, the vertical members are under compression and the horizontal members are under tension. To move away from this conventional system, we conceptualized a triangular framework that forms a veritable ‘exo-skeleton’ for the building. In the steel support used in the building, the web-like exoskeleton withstands both compression and tension.
The triangle is one of the most stable forms and provides the required flexural stability for the structure. Therefore, we were able to avoid ties and braces, which are typically found in steel buildings. The genesis of this idea was from an attempt at a bit of biomimicry. It is inspired by arthropods – or insects that possess an exo-skeleton. The exo-skeleton gives them better muscle leverage, enabling them to carry weight many times their body weight.
Similarly, the lattice structure we used transfers the slab loads to a web-like structural system built in steel. Not only does this provide great structural ability, but we wanted to leverage the aesthetic appeal as well. Our intent was to use the structural system as the architectural highlight by making it a key design element. In addition, the structure is also amazingly earthquake resistant. The design is a great example of balancing aesthetic appeal with structural stability.
The say that ‘God is in the details!
Here too we have had to painstakingly detail out the joints or ‘Nodes’ as we called them, to actually erect the building. The Nodes are the interface between the horizontal beams and the lattice. Their precision of alignment and design both were very crucial, while execution, even if one of the nodes was out of alignment by say 5mm at the ground level, it would lead to an error of about 100 mm at the top, perfectly drawing up the marking and achieving the same at site was critical. The detail of all the joints of the members have been dealt with, with as much aesthetic detailing as structural sufficiency.
Construction methodology
Once the design concept was frozen, it was then a matter of building the structure that we had never built! I had to come up with a Construction methodology that would help us bring the design to reality, the complex “Tapestry in Steel” had to be simplified! The solution had to be simple, repetitive, and cost effective. After all this was to be built by an ordinary fabricator without the use of CNCs or robotics…!
Simplicity was achieved by breaking down the Lattice into smaller elements that could be easily understood by the workers, better understanding gave them more confidence at site, after we had erected the ground floor one of the fabricator told me he had an ‘easy-feel’ about the rest of the build. It was our ‘Lego’ approach that seem to work…!
We had to work out an algorithm of geometry, alignment and assembly that had to be taught to the people at site so that they knew what to do. This was a set of rules of what came first, what factors were given importance than the others, a logic statement of how to adjust slight misalignments to not cause a deformity.
The Lattice comprised mainly of two elements, the ‘nodes’ and ‘struts. A typical node had 6 struts meeting into it. Almost all struts were the same size, except the ones at the vertical edges of the building. Using the Lego assembly approach, these parts were factory made and brought to site to be assembled, but here there was a challenge…! The entire lattice was to appear like a “tapestry in steel” which meant that we could have gussets, cleats and flange plates usually associated with any steel junction.
But now we had another problem, since we had 6 tubes that met at a node, it was impossible to have all of them slide into a node, since all the nodes were prepositioned at specific locations on the elevation. So how do you slide a tube with sleeves on both ends between two nodes…?
It took some creative, out of the box thinking to crack this! If the pipes could not slide, could the sleeve slide instead? That was it….! A ‘Sliding Sleeve’. This simple idea of sliding the sleeve inside the tubes after they have been positioned perfectly between the nodes was the only way this could have been done.

Principal Architect, Opus Architects


